Monday, August 30, 2010

Yellow or Shout Softly

This will be Mrs. Remodel’s last blog posting for a month as Europe beckons with a wedding to attend and family and friends to visit. Mr. Remodel will not be joining Mrs. R, as he has to do his day job and finish the house. Now before you, dear reader, cry foul, remember that this blog is a tad behind the actual remodel schedule so he isn’t quite being abandoned with a barely finished house. No sooner will he be back from dropping me off at the airport, leaving me to the capricious clutches of airline companies, he will be hitting the waves and eating ice-cream without fear of stink eye from Mrs. R.

Back to the kitchen…
With the cabinets in it was time to put the larger appliances in and attach the sink.


Here is the dishwasher with its stylish little jacket on. It’s a GE and has a latch opening, which is easier on my dodgy neck, rather than a handle you have to tug at to open.


Here is my brand new oven. It is a Maytag with a double oven. With just Mr. & Mrs. Remodel in the home, heating up an whole oven for one casserole dish doesn’t make sense and is wasteful. Now I can use the small upper oven 80% of the time and save energy. But it is gas and I am used to electric so this will be a new experience to tackle.


Here is the fridge housed in its little cubbyhole. It does stick out more than anything else but I wasn’t going to pay more for the less deep model and most kitchens have the same thing so…


Here is Mr. Plumber being eaten by the sink unit cabinet. Wait; no he is installing the brackets for attaching the sink.


Here is the sink all installed with the IKEA faucet and a very handy metal strainer that fits on the sink. The dishwasher has also been installed.


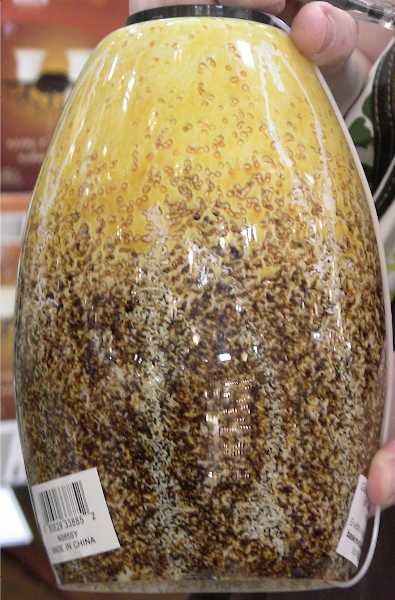
IKEA recommends their butcher-block counters be oiled with a wood treatment oil (IKEA sells its own) to stop it becoming dry and to seal it against water absorption. What I liked about the butcher block in the IKEA store was that it looked weathered with a tinge of grey. Once we put the oil on, the counters turned a darker brown (compare the picture above with the one before that). That was not what I wanted.
If we hadn’t put it on, the counters would be prone to contracting and expansion when water was spilt on it (this is a kitchen after all – and more to the point, my kitchen). But the look I wanted was the unoiled version, although I didn’t know it at the time. Well not much I can do about it but it’s a bit of a let down.


The green door is going to be painted eventually but doors are not a priority right now.

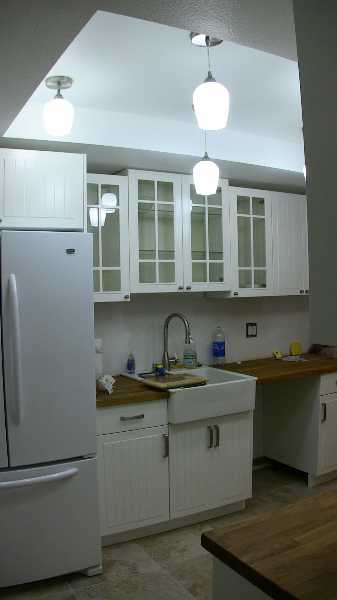
Let’s talk lights. I looked and looked for some pendant lights at a reasonable price with some yellow in them but it was a no go. Apparently yellow isn’t available much in lower-priced home décor items. Goldish yellow is available but not lemon or yellow. So I settled on some white lights at Lowes.
The original idea was to have them all hanging down with the same drop. However in all our planning and planning and more planning we had missed something important. We realised that when the cupboard over the fridge was opened it would hit any light hanging down. Ah!

Mr. Remodel came up with the idea of having the lights hanging at different levels so it looked like we meant it. I liked the idea except that to miss the door opening, that light had to have no chord drop which made it look ‘funny’. And because if one of the lights had that look, another one had to have it too as we had six lights and hung them in long, medium and short (ie zero) drops.


I couldn’t see an alternative solution so agreed but the negative aspects of the kitchen, for me, was growing.


To match the kitchen lights, we bought a longer version which will go into the dining room area above the table.


This settled, the last big decision was getting the lemon tile. For weeks I carried around a lemon paint sample that matched the hue I was after but had to finally admit defeat. There were Mexican-style tiles on-line that claimed to be lemon but I wanted the standard 4” x 4” clean lined ceramic tile. Unfortunately it didn’t seem to be available in lemon.
We found a yellow called Sunflower but it looked a little strong for me.Mr. Remodel really liked it and said it would be great. I had a sample leaning against the wall for weeks trying to convince myself that it would be alright.
I agreed to use it and we ordered the tile.
Mr. Remodel decided to install it with Mr. Fix-It’s help. I was busy elsewhere when they started and when I came out part-way through the job, I was horrified.


One tile sitting against a white wall looked very strong, a whole section of them next to each other seemed to be yelling and also looked very dark. Some of that was caused by the shadow between the tiles. Once the tile was grouted it improved a little.


But not as much as I would have liked.


I was very upset. It was not the look I wanted. I wanted lemon because with white cupboards, I did not want the tile to dominate too much and I feel this tile does.
But ultimately it is just a kitchen. No one died or got a terminal illness and some people don’t have a safe, warm place to sleep so upset will be short-lived.


So there we have a kitchen, which Mrs. Remodel partly loves and is partly ambivalent about. I’m disappointed that it didn’t turn out quite as I had imagined it, particularly the yellow tile, but as I set out my kitchen wares and small appliances, and put some art up it will feel more like mine (plus some of those items will hide some of the tile). But it is still a great kitchen.
What is very clear is that the kitchen feels a lot bigger than the old one even though the counters are no less deep that the old cabinets. It’s probably the lighter colour in part. Whatever the reason, it is roomy, stylish and is another dramatic transformation.

Let’s remind ourselves what we started with.


And how it looks now.

Sunday, August 29, 2010

It’s All White Now

So we left the happy couple painting on Saturday evening trying to finish the kitchen before the installers came on Monday. Well… considering that the parts of the room that would covered by the cabinets and backslash tile only needed one coat of paint, it still took from 8pm until 2am for Mr. & Mrs., R to finish the priming - not the two hours Mr. R estimated. Why, who knows? We worked and didn’t mess around but that’s how long it took. Which meant we had to do the areas that needed a second coat on Sunday afternoon.
However, it did mean we were ready for Mr. Installer the next day (well except for that little matter about not having the sink unit cabinet which Mr. R had to drive off and get so work could continue).
Prior to installation day, Mr. Installer had come round and gone through each side of the kitchen, inch by inch to ensure that we had calculated our cabinets and fillers correctly.
It isn’t always possible to have each cabinet butt up next to each other because of things like sinks, dishwashers, fridges, changes in ceiling heights etc. all of which we had. Also the length of each wall won’t add up nicely to the exact number of cabinets, another reason for having fillers in between or at the end. We also had our little custom peninsula, which Mr. R had designed for the watching of education and mind-altering (in a good way) videos or DVD or whatever the latest system is.
So finally the day had come. The walls were painted, the cabinets were (mostly) here and so were Mr. Installer and his trusty cabinet putter together assistant.

Since seeing is believing for many people, here is the kitchen installation mostly in pictures.


There’s lots of measuring to do to make sure that everything is lined up and put in correctly so you don’t get a problem several feet and many cabinets later.


It is fun to see it slowly come together.


It’s really beginning to take shape.


Cutting the peninsula counter top was tricky as there was only one chance to do it or we needed to buy another piece.

Microwave in place.


Counters in place. The sponge was taped in place to prevent Mr. Installer banging his head again.

Counters look good.


Sink just sitting on the unit for now as it needs a dishwasher drain hole drilled in it. IKEA will replace the sink if their authorized driller does the work and the sink cracks. But not if anyone else does it. Mr. Sink Driller can’t come till the next day.

Love that bookcase.


Love that too.


Because the kitchen itself has no windows, we thought these glass doors would create a window effect to some extent.


The wall space on the end is to accommodate Mrs. Remodel’s artwork.


Love it, Love it, Love it.


A successful drill job.

As you can see, Mrs. Remodel chose the single sink bowl unit. This is the type of sink that Mrs. R grew up with and wanted again. Mrs. R doesn’t like the lack of room she finds when trying to wash pots in the sink and didn’t want a huge sink in a small kitchen space.

The installation took about four days and over all we were very happy with the experience. I’m sure Mr. Installer thought that Mr. Remodel hovered a little too much but he would had done a couple of things wrongly if Mr. R had not pointed them out. We wouldn’t hesitate to recommend Mr. Installer and Chief Mr. Installer’s company.

After watching all that work going on, I’m pooped so we’ll leave the remainder till next time.

Thursday, August 26, 2010

Deadlines and Designs

We thought it would be a good idea to be able to do the same job in multiple places at once rather than keep stopping and starting all the time with different tools and materials but it didn’t always work out that way.
The idea was to finish all the downstairs drywall/cement board/purple board at once, then do all the taping and mudding, then all the painting. But sometimes scheduling our outside workers and other issues meant that these areas ended up progressing in different stages.

In the master bathroom we had had to go back and replace some of the drywall we had already put in.

This is ordinary drywall and it needed to have purple board instead. Plus, since we would be putting cement board below that in preparation for tile, we had to put in plastic sheeting and it was easier to do it from the top.


While we (as in Mr. R and helpers) were doing this, Mr. Tile was putting in the kitchen floor.


After which we replaced the boards in the kitchen and started mudding them ready for painting.

I’ve decided that mudding is one of my least favourite parts of this remodel. For those who don’t know about this is about: after you put up drywall/purple board/cement board, you put tape (either like packing tape or a mesh tape) over the seams followed by wallboard compound or mud as some people call it. Mud also goes over the nail or screw holes that affix the board to the studs. It is goopy and has to be spread on thinly and then sanded flat and smooth once the mud has dried. Mr. Fix-It is very good at putting this on but it can still take two or three coats. So you mud, let dry, sand, mud, let dry, sand etc. It takes forever, or so it seems.


Leaving the bathroom and living room aside for now, it is full steam ahead in the kitchen because we have scheduled the kitchen installers and we need to have the room ready to go. That means: kitchen removed – yes; floor tile installed – yes; drywall repaired/replaced – yes; drywall mudded – yes (see above); walls textured – yes; room painted – no. No. What do you mean it’s not painted? It’s Saturday evening, the installers are coming on Monday and we don’t like to work on Sundays, and the room isn’t painted. Well everything takes longer than you think/want it to and you suddenly find yourself backed up against a deadline.
“No worries,” says Mr. Remodel at 8pm as we start to paint, “We will be done in two hours.” Tra la la.
As we step aside leaving the happy couple to their paint and brushes let’s discuss kitchen design.

Mrs. Remodel has never had kitchen she has chosen herself so when she was afforded this opportunity she had no hesitation as to what she wanted. A white kitchen with a kind of slatted-wood look on the doors she had seen in a catalogue in England years ago. This, she thought, would fit well with a beach-look decor.
Several companies do this design so it wasn’t hard to find. So we duly looked at the cabinet sizes they had and tried to work out the number and placement we wanted. Our design was going to include an open bookcase for recipe books (up to now, Mrs. R had always had hers in a cupboard and she wanted them more visible and accessible) and large pantry cupboards in the dining area. It also incorporated a peninsula that would allow for the watching Mrs. R’s art history videos on the TV in the living room while prepping food.
There are many websites and books that will give you checklists for considering what you need from a kitchen. We could take some of the dining area space for pantry cupboards because we have a small dining table and mostly entertain in small groups. There is only one cook and no children so we didn’t need to take additional bodies into account. Everyone’s situation and needs and wants are different so it is wise to spend a long time thinking about what you want as it is a lot harder to change it later. We also started out deciding to move the plumbing to where we wanted it but eventually changed the design to fit with the plumbing as it was to save money.
We poured over different configurations for hours and when we took the plan to a large home improvement store (not Lowes), we got sticker shock, as Mr. Remodel calls it, when the cost was added up. The final price was $13,000. The price didn’t sound any better when we gave up wooden doors for particleboard, which came to $10,000. The price did not include appliances, installation, or those nice softly closing drawers and door hinges.
A friend suggested we visit IKEA. They too had that same slatted-wood look design and, if anything, it looked nicer to me that the other more expensive versions. I also fell in love with their oak butcher block or my counters, which would cost around $200 instead of the $5,000 fancy yellow granite I liked (in spite of not really wanting granite).
The downside was that IKEA did not do all the same sizes of cabinet as the other companies so we had to come up with a new combination of cabinets, which took more time. However, on the plus side, the cost was under $5,000 and the price DID include those nice softly closing drawers and door hinges. Just at the time we wanted to buy the cabinets IKEA was offering 10% off kitchens over $5,000 with free delivery so we added some of those tres bon pull-out drawers for the pantry cupboards to tip us over $5,000. They were also offering a discount on the installation with the only IKEA-authorized installer in the area so we decided to let them do the work while saving ourselves some money at the same time.
Thankfully, with kitchens, you don’t have to go round with a trolley and pick each item off the shelves as we had a final list of over 260 items. I will say when you do make up your list for delivery, check it and check it again to make sure you have everything or you will be driving back to IKEA after the installers arrive for the sink unit you forget to order.

Since you’ve had to wade through a lot of information, I’m ending with how the living room looked after all the IKEA stuff (minus the butcher block and pantry cupboards which had to be put in another room) and the appliances were delivered ready for the installers.


Wednesday, August 25, 2010

Going…Going…Gone

With a completed bathroom upstairs (i.e. a place to wash, a toilet, and a sink for washing hands and dishes) both the kitchen and the rest of the downstairs bathroom could come out. Oh how happy were Mr. Remodel and Mr. Fix-It and his Helpers who, you already know, love demo.
Of course Mrs. Remodel is more ambivalent. Demolition means something else will be worked on and eventually fixed. But in the mean time she is losing the kitchen for several weeks and the stuff stored in there has to go somewhere else and there isn’t anywhere else for it to go except the floor which is getting quite crowded.

Let’s start with the downstairs master bathroom which had almost been cleared out already and had some of its drywall replaced.

Here it is with shower and toilet still in place (this is an older picture before the drywall went up).

Here they are gone.


What has been interesting is to see what things look like behind the fixtures and walls etc. I suppose I imagined things to be neater and better-looking. Above is the drain for the shower in a large hole. Perhaps it’s all as it should be but it doesn’t look very nice although I suppose it doesn’t matter. If the drain drains and it’s hidden and never seen by the homeowner, that’s probably good enough. However, I wasn’t keen on some of the construction debris that the original builders had left in a gap behind the built-in shower. I suppose they thought it would never be seen and if it were, they would be long gone. But for a tidy person, there is just something wrong about this. It’s sweeping the dirt under the carpet on steroids.

Onto the kitchen.

Before.


One of Mr. Fix-It’s Helpers particularly enjoyed smashing the tile counter with a hammer. Much better than trying to scrape up the vinyl flooring which appeared to have been stuck down with superglue. The cabinets, on the other hand, had to be taken down more carefully because they were being given to someone to use in their home. Recycling.
BTW. If you are taking out fixtures and fittings as the result of a remodel, try contacting Habitat for Humanity first in case they can use them. They didn’t want our cabinets because they didn’t take cabinets that had been nailed in. They thought they couldn’t come out intact enough to be used. Ha, they hadn’t countered on Mr. Fix-It who got them out without any damage and a lot easier than it should have been, and they went to someone who needed them.

After.

Quite a change eh?

The brown paint is the colour of the wall behind the cupboards because the cupboards didn’t have any backs to them. I hope that isn’t the colour the kitchen was originally painted. See how funky the drywall is at the bottom where the sink was.

It’s hard to imagine that there’s going to be a really nice kitchen here in a few weeks. For now the kitchen is a table, a microwave, a fridge downstairs and a sink to wash-up in upstairs.

Originally, the kitchen backsplash was going to be six inches high of some sort of sandy-brown tile with paint on the wall above it. I bought pendant lights at Lowes to fit the theme even though I hadn’t found the tile yet.


Then I changed my mind. Partly because I just couldn’t settle on a tile. I suddenly decided that I really wanted was a tiled backsplash in yellow to fill the whole area instead. Not a bright yellow, more a lemon with lots of white in it to tone it down.


Therefore all the regular type of drywall in backsplash areas had to be pulled out to be replaced by cement board and purple board which we'll get to see next time.